ZLP630 suspended platform is one of the most popular hanging working platform model. Before using the suspended working platform, we need to install the system. But how to install or accemble a suspended platform? In this articel, we will show you a detailed ZLP630 suspended platform installation guide.
Part 1: Confirm all the parts of suspende working platform
Part 2: Install the working platform
Part 3: Install the suspended mechanism
Part 1: Confirm all the parts of the suspended platform
A complete suspended platform system consists of many important parts, such as suspension mechanism, lifting hoist, electric control box, safety lock and so on. Before starting to build the suspended platform, please confirm all the parts of the suspended platform. There are the components of the ZLP630 suspended platform below.
A completer suspended platform system is mainly including two parts: working platform and suspension mechanism. The suspension mechanism consists of front beam, middle beam, rear beam, front support, upper column, rear support, and balance weght. The hanging working platform parts are inluding steel wire ropen, safety lock, hoist, electric control box, and the metal working platform.

Part 2: assemble working platform
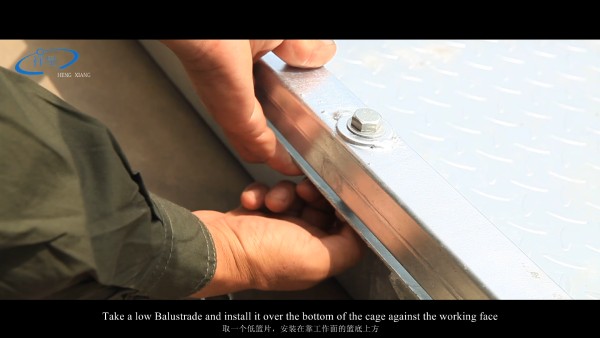
1. Select a relatively flat site, put the three-cage bottoms in one font. Take a low balustrade and install it over the bottom of the cage against the working face. Install the bolt fixing in the middle position, and then install a high balustrade piece on the other side of the cage bottom, the same bolt fixing. In the same way, insert other balustrade pieces.

2. Connect the cage bottom, between the two adjacent cage bottom and the joint of the balustrade, install the bolt.
3. Connect the balustrade pieces and install bolts on the adjacent balustrade pieces.
4. The installation hoist frame, turn the side with the roller into the platform and bolt
5. Install the safety lock, and the roller end is facing the working platform.
6. Install the hoist, alignment bolt.
7. Install the limited switch. First remove the two nuts of the safety lock, install the formed switch on the safety lock, and tighten the nut.
8. Install electric direction and each connecting line. Hang the electric control box in the middle of the high blue chip, and the side with the push button faces into the working platform. Insert the handle plug, motor plug and cable plug into the socket respectively.

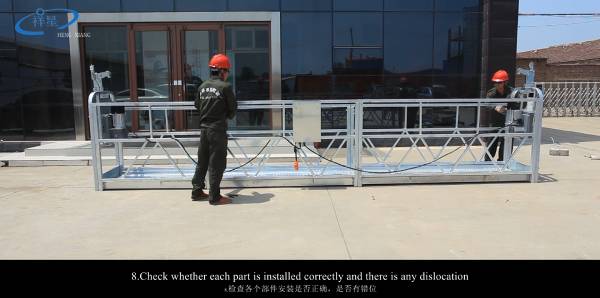
9. Check whether each part is installed correctly and there is any dislocation. Note the specification of bolts, length, and size of gaskets. Large washers must be used in contact with the square pipe. After confirmation, lock all bolts.

Part 3: Suspension mechanism installation
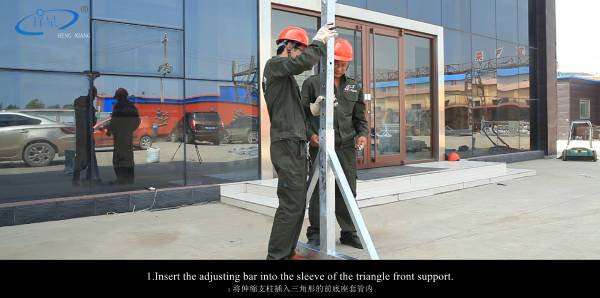
1. Insert the adjusting bar into the sleeve of the triangle front support. Adjust the height of the telescopic pillar according to the height of the parapet wall. Bolted, installation of the front base is complete.

2. Insert the adjusting bar into the sleeve tube of the rear support. The height of the telescopic pillar is equal to that of the former base. Install the rear support.
3. Load the front beam and the rear beam into the telescopic pillar of the front and near base respectively. Connect the front and rear beams with the middle beams, and select the overhang of the front beam and the distance between the front and near vase according to the actual situation. It usually overhangs 1.3 meters.
4. Place the upper pillar on the telescopic pillar of the front bracket and fix it with bolts. The erection of the upper support is completed.
5. Install the hanging front sleeve, rear coupling sleeve and ring-hook screws in turn. Through the strengthen rope to the roller of hanging front sleeve. Use the steel grip to fixed, then through the roller of upper column and rear sleeve the end to hang on the ring-hook screws, with wire rope grip fixed. Adjust the screw of the ring-hook screws to tighten the strengthen rope.
6. The hoisting wire rope and the safety wire rope are respectively fixed on the front beam frontal hanging plate. By pass the steel thimbles and fixed with a wire rope grip.
7. Install limit plate at the appropriate place of the safety wire rope.
8. Installation and counter weight. Each set is equipped with 40 pieces.
9. The hanging mechanism on the other side shall be installed as in the previous example.
As the ZLP630 suspended platform is mainly used for aerial work, safety is extremely important. During installation, the installation works must strictly follow the suspended platform installation guide. Besides, workers must be trained on the rules and safety regulations for suspended working platform before being allowed to use the equipment. If you are still confused about the hanging working platform installation or have any purchase plans, please feel free to contact us.


